
brought to you by Hayden Books

Painting:
Creating Basic Textures
Art by MADworks
Painting:
Creating Basic Textures
Art by MADworks
Studio Usage:
You can create textures by scanning textured items on a flatbed scanner or by using
Photoshop filters. A simple example of a texture is of a "rag" or fiber-filled paper.
When you create textures for use as backgrounds, isolate the texture on a separate layer.
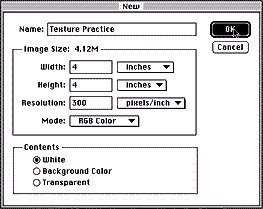 1. Create a New Document
Choose File-->New [@Cmd]-N to create a new document. Depending on the resolution of the
output device, enter a document size and a resolution for the file.
 2. Add Noise to the Document
Choose Filter-->Noise-->Add Noise. The Add Noise dialog box appears containing a preview
of the document with the default Noise settings. The Add Noise filter adds random pixels to
a selection; enter the amount of pixels that you want generated in the document. Select the
Gaussian option to view the difference between the Uniform option and the Gaussian option.
Click OK when the desired effect is produced.
 3. To Add Dimension to the Texture
Choose Filter-->Stylize-->Emboss. The Emboss dialog box appears, containing three options:
Angle (the direction that imaginary "light" is coming from); Height (how "high" the pixels
are "raised" above the surface of the image; and Amount (the intensity of the contrast
between the lightest and the darkest pixels). Experiment with the sliders until the desired
effect is produced. The angle setting can be entered manually or can be generated by dragging
the line inside the angle circle.

 4. Experiment
Create a new document and try adding brush strokes to the file before you generate noise.
Try Filter-->Blur-->Blur or Filter-->Blur-->Blur More before applying the Emboss filter.
Try feathering a selection and then adding noise and the emboss filter.